
How to Maintain Your Garden Watering Products Throughout Winter

As the gardening season winds down, it can be tempting to put your watering equipment away and forget about it until spring. But a little preparation before winter arrives can make a big difference to the condition and performance of your garden watering products.
Cold temperatures, frost, ice and prolonged exposure to damp conditions can all affect watering equipment. Water left inside hoses, sprinklers, controllers and other products can freeze and expand, potentially causing damage that may not become apparent until you need to use them again.
Whether you have a garden hose, hose reel, sprinkler, watering controller or pressure sprayer, taking a few simple steps before winter can help protect your equipment and make getting back into the garden easier when spring arrives.
Here’s how to prepare and maintain your watering products throughout winter.
Why should you prepare your watering equipment for winter?
The biggest winter concern for many watering products is frost.
When water freezes, it expands. If water is trapped inside a sealed or partially enclosed component, the resulting pressure can put strain on internal parts, connections and housings. Repeated freezing and thawing can make the problem worse.
Even if temperatures don’t regularly fall below freezing where you live, winter can still bring heavy rain, damp conditions and prolonged periods when your watering equipment isn’t being used.
Preparing your equipment for winter can help to:
- Reduce the risk of frost and freeze damage.
- Prevent water from remaining trapped inside products.
- Keep hoses and connections in better condition.
- Reduce the build-up of dirt, algae and debris.
- Protect products from unnecessary weather exposure.
- Make your watering equipment easier to use when spring arrives.
The good news is that most winter preparation is quick and straightforward.
1. Drain your garden hose thoroughly
One of the most important steps when preparing a hose for winter is to drain it completely.
Disconnect the hose from the tap and hold or position it so that as much water as possible can run out. If you’re using a hose reel, slowly unwind the hose and allow any remaining water to drain before storing it.
Don’t assume that a hose is empty simply because no more water is coming out of the end. Water can remain in low points, connectors or sections of hose that are lying flat.
How to store a garden hose for winter
Once your hose has been drained, store it neatly rather than leaving it stretched across the garden.
If you have a hose reel, rewind the hose evenly without forcing it into tight bends. This helps keep it organised and ready for use next season.
For loose hoses, avoid creating sharp kinks when coiling them. Store the hose somewhere protected from extreme weather wherever possible, such as a shed, garage or other sheltered area.
Keeping your hose off the ground can also help reduce unnecessary exposure to mud, standing water and other contaminants.


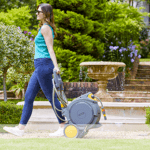
2. Protect your hose reel
Your hose isn’t the only part of your watering system that needs attention. Hose reels should also be prepared for winter.
Before storing your reel, check the hose, connectors and fittings for signs of wear or damage. Clean away any dirt or mud that has accumulated during the gardening season.
If your reel is portable, consider moving it into a shed, garage or other sheltered location during periods of severe weather.
For wall-mounted reels that cannot easily be moved, make sure the hose is fully drained and securely stored. Check the manufacturer’s guidance for your specific reel, as recommended winter storage can vary between products.
Taking a few minutes to inspect your hose reel now can also help you identify any parts that may need replacing before the next gardening season.
3. Empty and clean your sprinklers
Sprinklers can collect dirt, soil and limescale over the course of the year. Before putting them away for winter, give them a thorough clean and allow them to dry.
Disconnect the sprinkler from the hose and remove any visible debris. If the sprinkler has adjustable components, check that they can still move freely.
Most importantly, make sure there is no water left inside the sprinkler before storing it somewhere protected from frost.
Don’t forget to check the sprinkler connection and washers too. If anything looks worn or damaged, replacing it before spring means you’ll be ready to water your garden without unnecessary interruptions.


4. Drain watering controllers and timers
Automatic watering controllers can be particularly vulnerable to freezing temperatures because they contain internal components and water passages.
If you use a watering timer or controller outdoors, check the manufacturer’s instructions before winter. Depending on the product, you may need to disconnect it from the tap and remove it from the water supply during periods of frost.
Where appropriate, disconnect the controller and allow any remaining water to drain from the system.
If your controller uses batteries, winter is also a good opportunity to check their condition. If the product is being stored for an extended period, follow the manufacturer’s instructions regarding battery removal or storage.
Don’t forget your irrigation system
If your controller is connected to an irrigation system, don’t overlook the pipes, connectors and other components.
Drain as much water as possible from the system before freezing weather arrives. Pay particular attention to areas where water can collect.
For more complex or permanently installed irrigation systems, follow the manufacturer’s winterisation instructions.
5. Clean and drain your watering cans
Watering cans are generally simple to look after, but they can still benefit from a quick clean before winter storage.
Empty the watering can completely and rinse away any dirt or residue. Check the rose for soil or debris and clear it if necessary.
Allow the can to dry before storing it upside down or in a sheltered location.
If your watering can is made from plastic, keeping it somewhere protected from extreme temperatures can help maintain its condition over time.


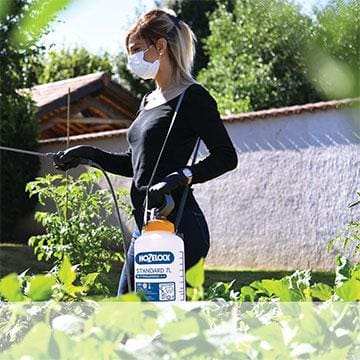
6. Prepare your pressure sprayer
Pressure sprayers can be used for a variety of garden tasks throughout the year, but they require particular care before winter.
After use, always empty any remaining liquid and rinse the sprayer thoroughly according to the manufacturer’s instructions.
Pay attention to the tank, lance, nozzle and hose. Residue left inside the sprayer can become difficult to remove over time and may affect performance.
Once cleaned, allow the components to dry thoroughly.
As with other watering products, protect your sprayer from frost. Store it somewhere dry and sheltered and follow the manufacturer’s instructions for winter storage.
Never leave liquid sitting inside the sprayer over winter unless the manufacturer specifically states that it is suitable for doing so.
7. Clean your connectors and fittings
Small components such as hose connectors, tap connectors, washers and other fittings are easy to overlook.
Before storing your watering equipment, inspect these parts for:
- Dirt or debris
- Cracks
- Signs of wear
- Damaged washers or seals
- Loose connections
Rinse away any dirt and allow components to dry before storing them.
If a washer or seal is showing signs of wear, replacing it before spring can help prevent leaks when you reconnect your watering system.


8. Don’t leave watering products outside unnecessarily
Not every watering product needs to be stored indoors throughout winter, but moving equipment into a shed, garage or other sheltered area can provide additional protection from the elements.
Where possible, avoid leaving watering equipment exposed to:
- Frost and freezing temperatures
- Standing water
- Heavy rain
- Snow and ice
- Prolonged damp conditions
- Direct sunlight when stored for long periods
If indoor storage isn’t possible, choose a sheltered location and make sure products are fully drained.
Always follow the specific storage instructions supplied with your product.
9. Check everything before storing it
Winter is a useful opportunity to carry out a quick watering equipment health check.
Rather than waiting until spring to discover that something has broken, inspect your equipment while you’re putting it away.
Look for:
- Cracks or splits in hoses
- Damaged connectors
- Worn washers
- Leaking fittings
- Blocked sprinkler nozzles
- Damaged spray nozzles
- Stiff or damaged moving parts
- Signs of corrosion or deterioration
Make a note of anything that needs replacing or repairing.
This simple check can save time when the gardening season starts again.


10. Get your watering equipment ready for spring
Winter maintenance isn’t just about protecting your products from cold weather. It’s also about making sure you’re ready to get back outside when the weather improves.
When spring arrives, take your equipment out of storage and inspect it again before reconnecting it to the water supply.
Check hoses and fittings for any signs of damage that may have developed during storage. Run water through hoses and irrigation equipment to check for leaks, and test sprinklers and controllers before you need them for regular watering.
If you stored batteries separately, check or replace them as necessary.
By doing this early in the season, you’ll have time to resolve any issues before your garden needs regular watering.
A little winter preparation goes a long way.
Looking after your garden watering equipment during winter doesn’t need to be complicated. The most important things to remember are simple: clean it, drain it, protect it and store it appropriately.
Pay particular attention to products that can retain water, as freezing temperatures can cause problems for components that aren’t designed to withstand freezing conditions.
Taking a little time at the end of the gardening season can help extend the life of your watering products, reduce the likelihood of winter damage and ensure everything is ready to go when spring arrives.
So, before you put your gardening tools away for the year, give your watering equipment a little attention too. Your future self – and your garden – will thank you for it.